On Friday, I had the great good fortune to take a class with Tim Holtz called artful assemblage. The class focused on learning how to use a variety of Tim Holtz products to make a three dimensional collage. We played a lot with distress crayons and distress collage mediums and used ideology ephemera, letter press and found relatives. I absolutely adore the collage I created. It features my one little word for 2016 and focuses on the idea of growing from a willful child to a brave woman. I meant to feature my current age (55) but that didn't really pan out. I did however include the year of my birth (1961) and the year I graduated from high school (1978).
I love Tim Holtz and use his products a lot (you can see many of my Tim Holtz creations, as well as class and book reviews by clicking and scrolling through this link). I first met Tim almost 15 years ago, when he was first starting out, at a Club Scrap retreat. He spent the entire weekend with the group and showed himself to be a funny, talented, genuine, generous person. And he's still the same, as well as a very gifted teacher. Tim is a self-taught, hands-on artist who began his career as a demonstrator at some chain craft store, so he's not long on design principles. He's also a brilliant business person and inventor who works with a variety of different manufacturers to try to get the highest quality product at a reasonable price. So he makes stamps with stampers anonymous, cutting tools with tonic, ink products with ranger, etc., rather than doing everything with one company.
The class reflected all this. The class was short on collage design theory but long on fun and other learning. This worked for me because I've taken (and taught) collage classes. I learned all about distress crayons (which I had sampled before but not really understood until this class). I also learned an amazing new tip - place your paint and glue/medium brushes in a baby wipe while you're using them to keep them fresh without becoming water logged. For our $85, we got three hours of amazing, personalized instruction, all the supplies for the project, a bonus apron and a bonus stand for our canvases! A huge value in my opinion.
One of the joys of Tim's classes is that he brings everything! I walked in with absolutely no supplies and was able to complete a project that I loved. Another joy is running into friends. Cindy McCool (pictured above) lives near me and we used to get together at least once a month to make art together. We'd lost track of each other recently, so it was quite a treat to walk into the classroom and spy her there! Although we were not sitting anywhere near each other and there was a huge variety of supplies to choose from, there ended up being a lot of similarities between our two projects. I guess that's what comes from being art sisters who have spent so much time together.
All-in-all, a terrific class and a terrific day!
Showing posts with label tim holtz. Show all posts
Saturday, June 25, 2016
Friday, December 13, 2013
A Quote and Link for Friday
Our hearts grow tender with childhood memories and love of kindred, and we are better throughout the year for having, in spirit, become a child again at Christmas-time.
Laura Ingalls Wilder
************************************************************************
I love Deb's "Just a Quote for Friday" tradition, so I'm following along with a Tim tag and photograph, circa 2000. And one more Christmas gift for you - check out this link to see a really wonderful collaborative between an elementary art school teacher, her students and artists from round the globe.
Laura Ingalls Wilder
************************************************************************
I love Deb's "Just a Quote for Friday" tradition, so I'm following along with a Tim tag and photograph, circa 2000. And one more Christmas gift for you - check out this link to see a really wonderful collaborative between an elementary art school teacher, her students and artists from round the globe.
Monday, March 5, 2012
Mosaic Butterfly Mini Album (March Monthly Make)
I'm trying to work my way through a variety of project kits I have purchased over the years, so I joined the Felt Fairy's Monthly Make Project. For March, I decided to make a cute little mini-album from Club Scrap.
You start with one piece of 12x12 printed paper, which you fold, cut, and fold again until it turns into an accordion album. The paper had a garden theme, in purple and greens.
The project kit left the cover design up to the artist, so I decided to make some mosaic butterflies using this fabulous technique featured on Tim Holtz's blog.
While I was playing, I made two extras. I'm keeping this red one:
But I'm sending this purple one to Deb for her Butterfly Project (read more here). While you're at it, you might want to check out my cousin Irene's wonderful post about the Project, her visit to the Houston Museum and her fabulous stained glass butterflies (click here to read it).
In making the butterflies, I followed Tim's instructions pretty closely, although I just traced the butterflies onto grungeboard because I don't have any of the dies. I then cut a piece of wonder tape around the right size, attached it to the grungeboard and trimmed. I used liquid platinum embossing powder instead of cement. I also used highly textured pieces of paper for my mosaic (most of them were extra backgrounds made in technique classes). I love how they turned out.
Have you tried Tim's technique yet? Made any butterflies? Doing the Monthly Make? If so, feel free to add a link, and I'll be sure and stop by.
You start with one piece of 12x12 printed paper, which you fold, cut, and fold again until it turns into an accordion album. The paper had a garden theme, in purple and greens.
The project kit left the cover design up to the artist, so I decided to make some mosaic butterflies using this fabulous technique featured on Tim Holtz's blog.
While I was playing, I made two extras. I'm keeping this red one:
But I'm sending this purple one to Deb for her Butterfly Project (read more here). While you're at it, you might want to check out my cousin Irene's wonderful post about the Project, her visit to the Houston Museum and her fabulous stained glass butterflies (click here to read it).
In making the butterflies, I followed Tim's instructions pretty closely, although I just traced the butterflies onto grungeboard because I don't have any of the dies. I then cut a piece of wonder tape around the right size, attached it to the grungeboard and trimmed. I used liquid platinum embossing powder instead of cement. I also used highly textured pieces of paper for my mosaic (most of them were extra backgrounds made in technique classes). I love how they turned out.
Have you tried Tim's technique yet? Made any butterflies? Doing the Monthly Make? If so, feel free to add a link, and I'll be sure and stop by.
Labels:
mini album,
monthly make,
tim holtz
Friday, January 6, 2012
Happy Birthday Tim Holtz!
Today, Saturday, Jan. 7, is Tim Holtz's birthday!
Linda Ledbetter of Studio L3 has set the Grungy Monday challenge this week as one to create a birthday card for Tim. Although I haven't participated in Grungy Monday for a while, I couldn't resist making a birthday card for Tim Holtz because he is such a wonderful, generous, creative person.
So, here's the card I made for him. Tim loves Disneyland (in fact, it seems to me that in some alternate universe Tim could be Walt Disney's illegitimate son). So, I made him a Disney card with a paper pieced Mickey Mouse from my stash. The bottle cap held by Mickey has been colored with alcohol inks and features an image from Tim's stamp line. The edges of the papers have all been distressed using the Tim Holtz distress tool and inked with distress inks. I feel very lucky to have met Tim and to have taken several classes with him. He really is a terrific person, and I hope he has a terrific birthday! If you want to join in the birthday party, go check out Linda's blog.
Linda Ledbetter of Studio L3 has set the Grungy Monday challenge this week as one to create a birthday card for Tim. Although I haven't participated in Grungy Monday for a while, I couldn't resist making a birthday card for Tim Holtz because he is such a wonderful, generous, creative person.
So, here's the card I made for him. Tim loves Disneyland (in fact, it seems to me that in some alternate universe Tim could be Walt Disney's illegitimate son). So, I made him a Disney card with a paper pieced Mickey Mouse from my stash. The bottle cap held by Mickey has been colored with alcohol inks and features an image from Tim's stamp line. The edges of the papers have all been distressed using the Tim Holtz distress tool and inked with distress inks. I feel very lucky to have met Tim and to have taken several classes with him. He really is a terrific person, and I hope he has a terrific birthday! If you want to join in the birthday party, go check out Linda's blog.
Labels:
tim holtz
Sunday, July 31, 2011
Class Review: Tim Holtz' Creative Blocks
Somewhere in the craziness of coming back from vacation and the stress of dealing with my poor, sick doggy, I had almost forgotten that I'd signed up for a class with Tim Holtz at Scrapbook Island in San Jose. Luckily, I had arranged to carpool with my friend Cindy, and she reminded me of the class. I took Creative Blocks ($85 U.S.) and made this wonderful assemblage which I call "Time Skips Along." The class lasted four hours, and we made a decorated canvas, on which we mounted three smaller canvases and a variety of ephemera. We learned an easy technique to create a grid pattern, how to use a graphite pencil for shading and how to use a variety of Tim's products. For me, it was an easy and very enjoyable morning in which I learned a few new techniques and got to spend some quality art time with friends. Of course, the person who made it all worthwhile was Tim:
It's hard to imagine that there would be a nicer, more natural teacher than Tim Holtz. I've taken a half dozen classes with him over the last ten years and, in spite of his success and popularity, he remains the same, friendly, down-to-earth guy he has always been. Even though there were 70 girls in the class, he was completely accessible and chatted with all of us before, during and after the class. Can't give the class anything other than an A+.
Did a little shopping too (sorry for the grainy, upside down picture - can I blame it on Blogger?). . . bought some October Afternoon paper, stamps from the discount bin, a bunch of travel themed paper ("Destinations") from Simple Stories, baseball paper from Moxie, some distress stains, embellishments for our upcoming family vacation to Washington state and some vintager bottle cap shaped images!
In other news, my dog Gypsy seems to have stabilized. She had a blood transfusion and a bunch of tests (including a bone marrow biopsy) to deal with a severely low level of red blood cells. Right now, it looks like she has some sort of autoimmune disease, which we're attempting to treat with drugs. We're all hoping for a good outcome, but her prognosis is definitely guarded. Good thoughts and prayers to St. Francis definitely appreciated.
Labels:
tim holtz
Monday, July 11, 2011
Grungy Monday #15 Guest Designer!
I'm thrilled to be one of the Guest Designers this week over at Linda Ledbetter's Studio L3 Blog Grungy Monday Challenge. The challenge always features techniques by the wonderful Tim Holtz (check out his webpage here). This week's challenge technique is from Tim Holtz's 2007 12 Tags of Christmas, Day 7. My entry is a page in my 2011 Resolutions Art Journal. I journaled about my resolution to try some portrait photography. The background for the page uses Adirondack Color Wash sprayed over some Club Scrap stencils. For the tag, I started with mustard distress ink and grunged with vintage photo. I chose an appropriate Tim Holtz stamp set and colored the main image with pine needles, black soot and faded jean. The antique camera image is from Stampin' Up. The other Guest Designer this week is Barbara Washington. Check out her work at the Magic Delights blog. You can also always find lots of grungy goodness at the "All Things Tim" yahoo group, including a spot to play along with each group;s challenge. You can find them here. If you want to play along with this week's challnege and see others working this technique, head on over to Linda's blog.
Labels:
2011 intentions,
tim holtz
Friday, June 10, 2011
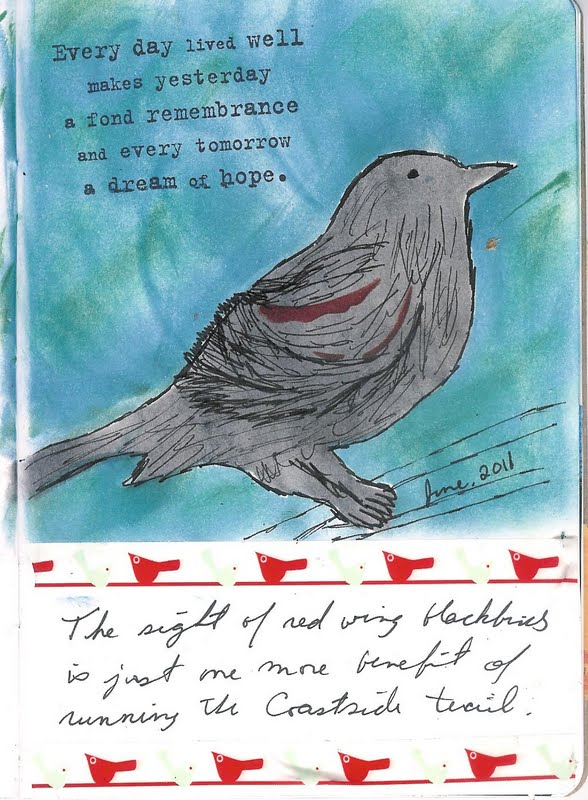
Distressed Blackbird Sketch (Grungy Monday)
I love red-winged blackbirds. I'm not sure if it's that deep flash of color on their wings or the memories it brings back of the book "Zen and the Art of Motorcycle Maintenance," which I read in college and found to be oh-so-profound at the time (somehow, I doubt it would hold up today, though). At the very beginning of the book, a father points out a red-winged black bird to his son who finds it unremarkable. And then there's this line: "At age eleven you don’t get very impressed with red-winged blackbirds. You have to get older for that." I'm not sure why that line has stayed with me, but it has. And I think of it and smile whenever I see one of these beautiful birds. The other day when I was running on the coastside trail, I spied one of these wonderful creatures, and I wanted to capture the feeling in my smashbook sketchbook. I wish I would have used the Zen quote, but I didn't think of it until it was too late, Still, I'm still reasonably happy with my page (and I did make it in 10 minutes). To make it, I used my Tim Holtz bird mask and used it along with some Tim Holtz distress inks. The technique is very timely because this week's Grungy Monday challenge over at the Studio L3 is to use distress inks!
It's also timely because these blackbirds signal summer, and I'm definitely getting into summer mode these days. Don't forget to check out my Summertime Snapshot and Photography Scavenger Hunt, which you can find at this link. It's looking like we're going to have two divisions: photography and snapshot teams! I'm very happy with the turnout so far, but there's definitely room for more. So, go check it out!
Labels:
sketchbook project,
tim holtz
Wednesday, May 18, 2011
Grungy Monday Art Journal Page
I have to admit that I wasn't that thrilled when the Grungy Monday technique challenge (posted here at Linda's Studio L3 blog) for this week was distress color blocking. Granted, it did come with a cool Tim Holtz video demonstration, which you can see here. But, I don't know. It just seemed so, um, well, plaid to me. But after looking at a few other contributions, I realized that the technique could be done in a more subtle way. Since my art journal has been sad and lonely lately, I decided to give it a go. I started with a Club Scrap mask and spritzed some pesto and terra cotta spray ink around in. Then, I filled the background in, using the color block technique (weathered wood, pine needles and some kind of orange ink). I really like how it turned out. The journaling reads, "It's time to start my summer reading." The image is a picture that I took of a statue in the harbor. Have you tried it yet? Am I only the only one allergic to plaid?
Labels:
art journal,
tim holtz
Tuesday, April 12, 2011
Grungy Monday 3: Adirondack Color Wash
This week's Grungy Monday Challenge at the Studio L3 blog features Tim Holtz's Adirondack Color Wash. I love these sprays and use them often with stencils. Since I needed to make some birthday cards, I pulled out a Club Scrap flower stencil an got started. For the card on the right, I used the stencil with butterscotch, cranberry and plum color wash. For the card on the left, I took the ink-covered stencil and pressed it onto the paper to capture the "negative image." For both cards, I then used a Dina Wakley technique, using a paint brush dipped in water to pull out the over-spray to create a subtle water colored background.
I love how these sprays can quickly create beautiful, unique images. While I was at it, I made a simple, but (I think) striking friendship page. The stencil is from Ed Roth.
Thanks for stopping by!
I love how these sprays can quickly create beautiful, unique images. While I was at it, I made a simple, but (I think) striking friendship page. The stencil is from Ed Roth.
Thanks for stopping by!
Wednesday, April 6, 2011
Grungy Monday: Fluid Medium Resist
Linda, over at Studio L3, is running a weekly Tim Holtz challenge called "Grungy Monday. " This week's technique involved stamping with fluid medium and then inking over the image with distress inks. The fluid medium acts as as a resist to give you some cool effects. Tim also cut out foam stamps, but I justed used a couple that I had laying around, including a medallion and an Easter Egg. The medallion card is a bit of a tribute to a fabulous card maker, Karen. She makes clean, classic cards. You can check out her blog here. For the Easter card above, I use a duplicate ATC from my stash. I channeled another one of my favorite card makers, Jacky, on this card. You can tell by the layers. Her blog is at this link.
When I was looking through my Easter stuff, I also found a large paper pieced chick that has been in my stash for years. I decided that today was the day to use it. So, I made this very "cute" card:
It certainly doesn't scream Tim Holtz, does it? LOL! Oh well, I actually kindof like it. Which card is your favorite? Do you have any favorite card maker blogs to share?
When I was looking through my Easter stuff, I also found a large paper pieced chick that has been in my stash for years. I decided that today was the day to use it. So, I made this very "cute" card:
It certainly doesn't scream Tim Holtz, does it? LOL! Oh well, I actually kindof like it. Which card is your favorite? Do you have any favorite card maker blogs to share?
Tuesday, March 29, 2011
How old do you need to be to own a dog?
One of the reasons I'm "fabulous at fifty" is that I've finally become a really good dog owner. I think it takes a bit of maturity and commitment that I didn't really have when I was younger. I was thinking about that as I made today's art. It's a tag using the Tim Holtz technique featured this week by Linda of the Studio L3 blog (click on this link). I photographed it outside on my back deck, and I really like everything about it. What about you? When do you think you are old enough to have a dog? I'm thinking a lot about why I'm fabulous and fifty this year as part of an ongoing project. Since the beginning of the year, I have been running an online project to keep people on track with their 2011 resolutions, intentions and one little word projects. March is almost over, so I'll be checking in with everyone this weekend to see how you are doing and to give you a chance to link up and show off.
I have three projects going (all in the form of art journals):
*my one little word ("health") journal (see e.g. here);
*my 2011 Resolutions Journal (see e.g. here); and
*my "Fifty an Fabulous" art journal (see e.g. here and read about my fabulous at fifty philosophy in this post).
If you click on the "2011 intentions" label below, it will bring up more pages and descriptions of my project. Hope you can join me this weekend.
I have three projects going (all in the form of art journals):
*my one little word ("health") journal (see e.g. here);
*my 2011 Resolutions Journal (see e.g. here); and
*my "Fifty an Fabulous" art journal (see e.g. here and read about my fabulous at fifty philosophy in this post).
If you click on the "2011 intentions" label below, it will bring up more pages and descriptions of my project. Hope you can join me this weekend.
Labels:
2011 intentions,
tag,
tim holtz
Monday, March 28, 2011
Grungy Monday & Blog Candy Winners
Linda of the Studio L3 Blog ran a terrific challenge series working her way through Tim Holtz's Compendium of Curiosities book. I did most of the challenges, but I lost focus toward the end. Now that she's done with all the techniques in the book, she's starting a new series called "Grungy Monday" focusing on a variety of other Tim techniques. I was inspired to play along this week and created this tag. You can see the challenge at this post.
For my background, I used Heidi Swapp ghost butterflies as masks, as well as Tim's border mask. Spritzed with cranberry and plum color wash inks. Smudged on aged mahogany and black soot inks. The focal element is a Tim stamp, embossed on grungepaper and then colored with antique gold and really red perfect pearls. Added vintage paper, bits of trim, some charms, Tim's ruler ribbon (which I won from The Scrappy Tree blog) and some very old doodad letters from Tim. Lots of grungy fun! Thanks for the challenge Linda!
In other news, the winners (I decided to choose 4) of the Tsunami Relief blog candy give-away are:
#3 Sharyn (who will receive several original photographs)
#18 Amy (who will receive an original piece of art)
#28 Kristy.A (who will receive an assortment of scrapbook goodies/ephemera) and
#37 Furry Pig (who will receive an assortment of handmade bookmarks and cards).
Email me your mailing address at rinda1961@yahoo.com, and I'll get your prize in the mail. Also, I wrote a check for $100 to the Red Cross Tsunami Relief fund. I had 44 comments and decided to round up to an even number. Thanks for your support!
p.s. Madeline Bea who ran the wonderful Creativity Boot Camp last summer just put up a wonderful post about the 1000 Crane photography project to benefit Japan. You can read it here.
p.p.s. Ali Edwards just posted here about a designer digital kit benefiting Japan.
For my background, I used Heidi Swapp ghost butterflies as masks, as well as Tim's border mask. Spritzed with cranberry and plum color wash inks. Smudged on aged mahogany and black soot inks. The focal element is a Tim stamp, embossed on grungepaper and then colored with antique gold and really red perfect pearls. Added vintage paper, bits of trim, some charms, Tim's ruler ribbon (which I won from The Scrappy Tree blog) and some very old doodad letters from Tim. Lots of grungy fun! Thanks for the challenge Linda!
In other news, the winners (I decided to choose 4) of the Tsunami Relief blog candy give-away are:
#3 Sharyn (who will receive several original photographs)
#18 Amy (who will receive an original piece of art)
#28 Kristy.A (who will receive an assortment of scrapbook goodies/ephemera) and
#37 Furry Pig (who will receive an assortment of handmade bookmarks and cards).
Email me your mailing address at rinda1961@yahoo.com, and I'll get your prize in the mail. Also, I wrote a check for $100 to the Red Cross Tsunami Relief fund. I had 44 comments and decided to round up to an even number. Thanks for your support!
p.s. Madeline Bea who ran the wonderful Creativity Boot Camp last summer just put up a wonderful post about the 1000 Crane photography project to benefit Japan. You can read it here.
p.p.s. Ali Edwards just posted here about a designer digital kit benefiting Japan.
Wednesday, January 12, 2011
Class Review: 12 Tags of Christmas
Before we're through with December, I thought I better write my Christmas class reviews. Even though Tim Holtz's Twelve Tags of Christmas is not technically a class, it definitely has that feel. Each day, between Dec. 1 and 12, Tim posts instructions for completing a tag using a variety of products (especially his signature products). This is the third year in a row in which he has undertaken this project and the first year that I haven't finished all twelve tags. The bloom was a little off the rose for me this year, I think, because so many of the tags featured products that I don't own - especially his die cutting machine and dies. Although Tim encourages participants to substitute other products, I found it difficult to do in this situation. Also, it struck me that a large portion of the tags used variations on these materials. In the past, almost every tag featured a different technique. So, this was not my favorite 12 Tags of Christmas, but I did enjoy making my tags, revisiting some old techniques and learning a few new ones. Plus, it's all FREE! Hard to be too critical of a free sharing of information. Something new for this year were videos. I love listening to Tim Holtz talk about how to create and so would play them for background, even if he was describing how to use a machine I didn't own. His voice is so calming and supportive that it increased my creative enjoyment. As always, alternative viewpoints welcomed. Overall grade: B.
Monday, December 20, 2010
Happy Solstice (Tim Style)
Today is December 20th, the Winter Solstice. If we had clear skies, I could even look outside and see a lunar eclipse. How cool is that! To celebrate, I decided to create a Happy Solstice tag using the technique being covered this week in the Studio L3 Tim Holtz Compendium of Curiosities Challenge: scribble stain distress. I sometimes have trouble with this technique, but I love how it turned out for what I wanted to do tonight. I used faded jean and mustard seed inks, along with vintage photo ink on this tag. Will you be joining the CCC this week?Were you able to see the eclipse where you are?
If you love Tim Holtz, you should definitely check out the give-away at the Yours Artfully blog. Click on this link to check it out.
Here's to longer days and happy creating!
If you love Tim Holtz, you should definitely check out the give-away at the Yours Artfully blog. Click on this link to check it out.
Here's to longer days and happy creating!
Labels:
tim holtz
Saturday, December 11, 2010
Tim Tag #10 & Let's Talk Vellum
Here's my Tim Holtz tag from yesterday. I made another snow cat (instead of the snowman he used) because I already used my grungebord snowman and I don't have his die or die cutter thing. Tim embossed a scrap of plastic packaging for his tag. As I don't have his embossing thing (yes, the "I don't have his [fill in the blank] thing" will be a refrain in my class review next week), I substituted some embossed vellum I had in my stash.
Which got me thinking about my vellum stash - which is kind of big. I have clear vellum paper, frosted vellum paper, colored vellum (in various shades of transluscentcy [gosh, I'm sure that's not spelled correctly]), patterned vellum and embossed vellum. I've got 8.5x11; I've got 12x12. But I hardly ever use it. LOL! So, I was happy to use it on this tag and love how it worked. I sometimes stamp a sentiment or print journaling on clear or frosted vellum but would love some other ideas to use up my stash of vellum. Got any to share?
Coming soon: Chistmas Club! Don't know what I'm talking about? It's a Sunday share suggested by Sian of High in the Sky. Lots of lovely Christmas memories are posted and gathered. Feel free to join in the fun.
Which got me thinking about my vellum stash - which is kind of big. I have clear vellum paper, frosted vellum paper, colored vellum (in various shades of transluscentcy [gosh, I'm sure that's not spelled correctly]), patterned vellum and embossed vellum. I've got 8.5x11; I've got 12x12. But I hardly ever use it. LOL! So, I was happy to use it on this tag and love how it worked. I sometimes stamp a sentiment or print journaling on clear or frosted vellum but would love some other ideas to use up my stash of vellum. Got any to share?
Coming soon: Chistmas Club! Don't know what I'm talking about? It's a Sunday share suggested by Sian of High in the Sky. Lots of lovely Christmas memories are posted and gathered. Feel free to join in the fun.
Labels:
tim holtz
Tuesday, December 7, 2010
Decorating and Counting Down
Clara and I took out the interior decorations to put them up today. We don't do a lot. We hung our stockings on the mantle along with a few other decorations:
Mostly we spent time putting up the various Nativity Sets. I started quietly collecting these a few years ago, and I try to add a new one each year (usually purchased at an after Christmas sale). Here's a picture of the very first Nativity Set I purchased (it's a small egg from El Salvador) and the most recent one (the Willow Tree pair):
As far as an Advent Countdown, I have 25 Tim Holtz style tags that I made two years ago on which I put the numbers 1-25. They're sitting on the hearth in a basket in the first picture of today's post. My plan is always to put them up, one each day. But my problem is finding an adhesive that will actually hold them in place! I try something new every year, but I'm still looking for the perfect solution! LOL! Speaking of Tim tags, here's my tag for Day #4:
Mostly we spent time putting up the various Nativity Sets. I started quietly collecting these a few years ago, and I try to add a new one each year (usually purchased at an after Christmas sale). Here's a picture of the very first Nativity Set I purchased (it's a small egg from El Salvador) and the most recent one (the Willow Tree pair):
As far as an Advent Countdown, I have 25 Tim Holtz style tags that I made two years ago on which I put the numbers 1-25. They're sitting on the hearth in a basket in the first picture of today's post. My plan is always to put them up, one each day. But my problem is finding an adhesive that will actually hold them in place! I try something new every year, but I'm still looking for the perfect solution! LOL! Speaking of Tim tags, here's my tag for Day #4:
How's your decorating coming along? Do you have a holiday collection?
Monday, December 6, 2010
More Tim Tags
Here are two more Tim tags - days 5 and 6.
For Day #5, I didn't attempt Tim's metal letter technique - simply substituted some glittery letters. And I don't ever have very good luck with his dabber resist technique. No worries -I just added paint at the end!
For Day #6, I don't think I had anything that he used! LOL! But I went with his basic framework and ended up really quite taken with my little snow cat. I think I may have the most fun when I have none of what Tim is using because I hae no pressure to try to replicate what he has done.
Half-way through. I'll miss them when they're gone.
Friday, December 3, 2010
Winter Skies (and more)
I'm continuing to follow along with Journal Your Christmas and Tim's 12 Tags of Christmas. I'll likely group a bunch of these together so they don't take over my blog. But, for now, here's a couple more.
Dec. 2 and the JYC Prompt is December Weather. My picture is above, and here's the journaling: "The days seem particularly short and cold this December. I'm sure there's the same number of daylight hours every year, but somehow nightfall seems to be coming earlier than ever and seems to be falling blacker than I remember in the past. Its also been unusually cold for us - the low 40's on most mornings. I even scraped ice off the car windshield earlier this week. We have been rewarded, though, with spectacular sunrises and sunsets. The winter sky is putting on quite a show."
Here's what the interior journaling page looks like:
The photo will go on the left hand page (pretty much filling it completely). I plan to print out a bunch of photos all at once, so they won't be added until much later. I learned with the Learn Something New Everyday project that simple works for me. I also learned to just sit down and do my entry as soon as I get a chance and not stress too much about it. That way it gets done,and the whole is definitely greater than the sum of its parts.
And here are my Tim Tags for Day #2 (the big one) and Day #3 (the little one).
I really like how they both turned out. Similar to Tim's tags, but different stamps. For Day #2, I love the custom stamp pad technique (I have even taught it in a class) and decided to use a new-to-me stamp. I didn't have the glossy enamels, so I used a sharpie poster paint pen instead. For Day #3, I didn't have tissue tape or the bird die, so I collaged sheet music on to a grunge board christmas tree. Stamped the Christmas postoid onto sticky back canvas and added some lace trim in lieu of his tissue tape wreath. Used the rest of the techniques he did.
Coming soon: Christmas Club; Christmas Cards and Henry's Futbol Season Opener!
Dec. 2 and the JYC Prompt is December Weather. My picture is above, and here's the journaling: "The days seem particularly short and cold this December. I'm sure there's the same number of daylight hours every year, but somehow nightfall seems to be coming earlier than ever and seems to be falling blacker than I remember in the past. Its also been unusually cold for us - the low 40's on most mornings. I even scraped ice off the car windshield earlier this week. We have been rewarded, though, with spectacular sunrises and sunsets. The winter sky is putting on quite a show."
Here's what the interior journaling page looks like:
The photo will go on the left hand page (pretty much filling it completely). I plan to print out a bunch of photos all at once, so they won't be added until much later. I learned with the Learn Something New Everyday project that simple works for me. I also learned to just sit down and do my entry as soon as I get a chance and not stress too much about it. That way it gets done,and the whole is definitely greater than the sum of its parts.
And here are my Tim Tags for Day #2 (the big one) and Day #3 (the little one).
I really like how they both turned out. Similar to Tim's tags, but different stamps. For Day #2, I love the custom stamp pad technique (I have even taught it in a class) and decided to use a new-to-me stamp. I didn't have the glossy enamels, so I used a sharpie poster paint pen instead. For Day #3, I didn't have tissue tape or the bird die, so I collaged sheet music on to a grunge board christmas tree. Stamped the Christmas postoid onto sticky back canvas and added some lace trim in lieu of his tissue tape wreath. Used the rest of the techniques he did.
Coming soon: Christmas Club; Christmas Cards and Henry's Futbol Season Opener!
Wednesday, December 1, 2010
Done and Done
For Shimelle's class, Journal Your Christmas, the Day 1 prompt is to write a manifesto. Here's what I've written:
"Stop. Ponder. Savor the present. This holiday season I will stop and ponder our life in the here and now, so that I may savor the present and leave a record for the future."
I think that captures what I want to do this year, which is really focus on Shimelle's prompts as they relate to our current life. The last time I did JYC I did a lot of backward looking journaling and thinking about how I view the holidays in general. I loved it, but I want to do something a bit different this time. I snapped a picture of my new Christmas mug filled with coffee and our calendar to illustrate my idea.
I also finished the first Tim Holtz tag. Here it is:
I know it doesn't look that much like Tim's tag, but it's done!
I wanted to share some tips for doing Tim's tags quickly:
1. I keep most of my Tim supplies in their own containers - all my distress inks are together, all my distress powders and crackle paints are in another, etc. This makes it easy to grab the container(s) I need and to put them back away.
2. I clean up as I go. This not only keeps my home a bit neater, but it also means I can find what I want the next day.
3. I improvise. Tim's tag for today included a very complicated house-build and some big things I don't own (the die cutter thing, the house die, the fence die, the embosser thing). Instead, I took the haunted house from the holiday grunge board pack and cut it down to a smaller size and regular house shape. I stamped the house with a crackle stamp for the texture. I hand cut my fence with some of the leftover haunted house. For the background, I sprayed some glimmer mist, instead of his perfect pearl mixture. I made wreaths for the house out of stickles, and I used glass glitter instead of white flocked stuff. And, of course, my tag and top treatment are different than his. In the end, mine looks a bit more like a Christmas mansion, I think that his more rustic cabin in the woods, but that's okay. As Tim himself says, use the ideas as a jumping off point, rather than a rules. I think of it like the Pirate Code; to quote Johnny Depp as Capt. Jack Sparrow . . . "they're more like guidelines really!"
"Stop. Ponder. Savor the present. This holiday season I will stop and ponder our life in the here and now, so that I may savor the present and leave a record for the future."
I think that captures what I want to do this year, which is really focus on Shimelle's prompts as they relate to our current life. The last time I did JYC I did a lot of backward looking journaling and thinking about how I view the holidays in general. I loved it, but I want to do something a bit different this time. I snapped a picture of my new Christmas mug filled with coffee and our calendar to illustrate my idea.
I also finished the first Tim Holtz tag. Here it is:
I know it doesn't look that much like Tim's tag, but it's done!
I wanted to share some tips for doing Tim's tags quickly:
1. I keep most of my Tim supplies in their own containers - all my distress inks are together, all my distress powders and crackle paints are in another, etc. This makes it easy to grab the container(s) I need and to put them back away.
2. I clean up as I go. This not only keeps my home a bit neater, but it also means I can find what I want the next day.
3. I improvise. Tim's tag for today included a very complicated house-build and some big things I don't own (the die cutter thing, the house die, the fence die, the embosser thing). Instead, I took the haunted house from the holiday grunge board pack and cut it down to a smaller size and regular house shape. I stamped the house with a crackle stamp for the texture. I hand cut my fence with some of the leftover haunted house. For the background, I sprayed some glimmer mist, instead of his perfect pearl mixture. I made wreaths for the house out of stickles, and I used glass glitter instead of white flocked stuff. And, of course, my tag and top treatment are different than his. In the end, mine looks a bit more like a Christmas mansion, I think that his more rustic cabin in the woods, but that's okay. As Tim himself says, use the ideas as a jumping off point, rather than a rules. I think of it like the Pirate Code; to quote Johnny Depp as Capt. Jack Sparrow . . . "they're more like guidelines really!"
Monday, November 15, 2010
Crazy Tim Cards
Needed to step away from my art journal for a while. I decided to check out Linda's Compendium of Curiosities Challenge this week at Studio L3. The technique is alcohol ink splatter, which is something very different than my typical style. Didn't have the special tool required for the technique but used a turkey baster! Love alcohol inks, but prefer other techniques to use them, I think. I just don't think splatter and mess are for me. What about you?
Labels:
tim holtz
Subscribe to:
Posts (Atom)